Links


Summary
Description ⤒
Time Tree is a Blender addon which adds a new way of dealing with Shot sequences using nodes instead of the common linear timeline.
Idea is to speed up your iterative process of finding the best timing and sequence whether you’re working on a storyboard, montage or etc...
Willing to reduce some workload of storyboarding iteration, I thought that instead of using a linear timeline we could maybe have some kind of non linear time tree.
And it actually ended up very promising 😄
The idea is quite simple, a node represent a camera shot with its own settings like:
- Start frame, end frame (yes it can go backward ^^).
- Final duration or speed.
- Scene.
- Camera.
- A previous & next socket linked to another shot.
Main features are:
- Choose any Scene & Camera for a particular Shot.
- Use and Reuse any timeline range of the same scene.
- Change speed, duration to create slow motion, fast motion, reverse or better timing.
- Work on alternative sequences in a non-destructive way.
- Keep your Sound Synchronized.
- Export everything automatically to the VSE.
Installation & Update ⤒
Installing ⤒
The addon is installed just like any regular Blender addon:
- download the latest version of the addon, do not uncompress it
- go to Blender’s user preferences, from the file menu, or shortcut CTRL + ALT + U on Windows
- open the Addons tab
- click Install add-on from file at the bottom
- navigate to the downloaded file and select it
- the addon is then installed
Updating ⤒
Most of the time, you should either uninstall the old version first or remove it rather than “Overwrite” it, before installing the new one.
Otherwise internal conflicts may happen within Blender.
In either case, you may need to restart Blender if you experience problems once the new version is installed, to make sure nothing from the old version remains in memory.
User Interface ⤒
Workspace Template ⤒
For more convenience, the addon comes with a new workspace template simply named “Time Tree”.
Just create a Time Tree workspace with the “Add Workspace” ‘+’ button next to your workspace tabs.
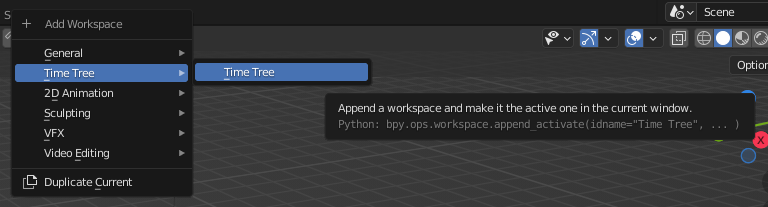
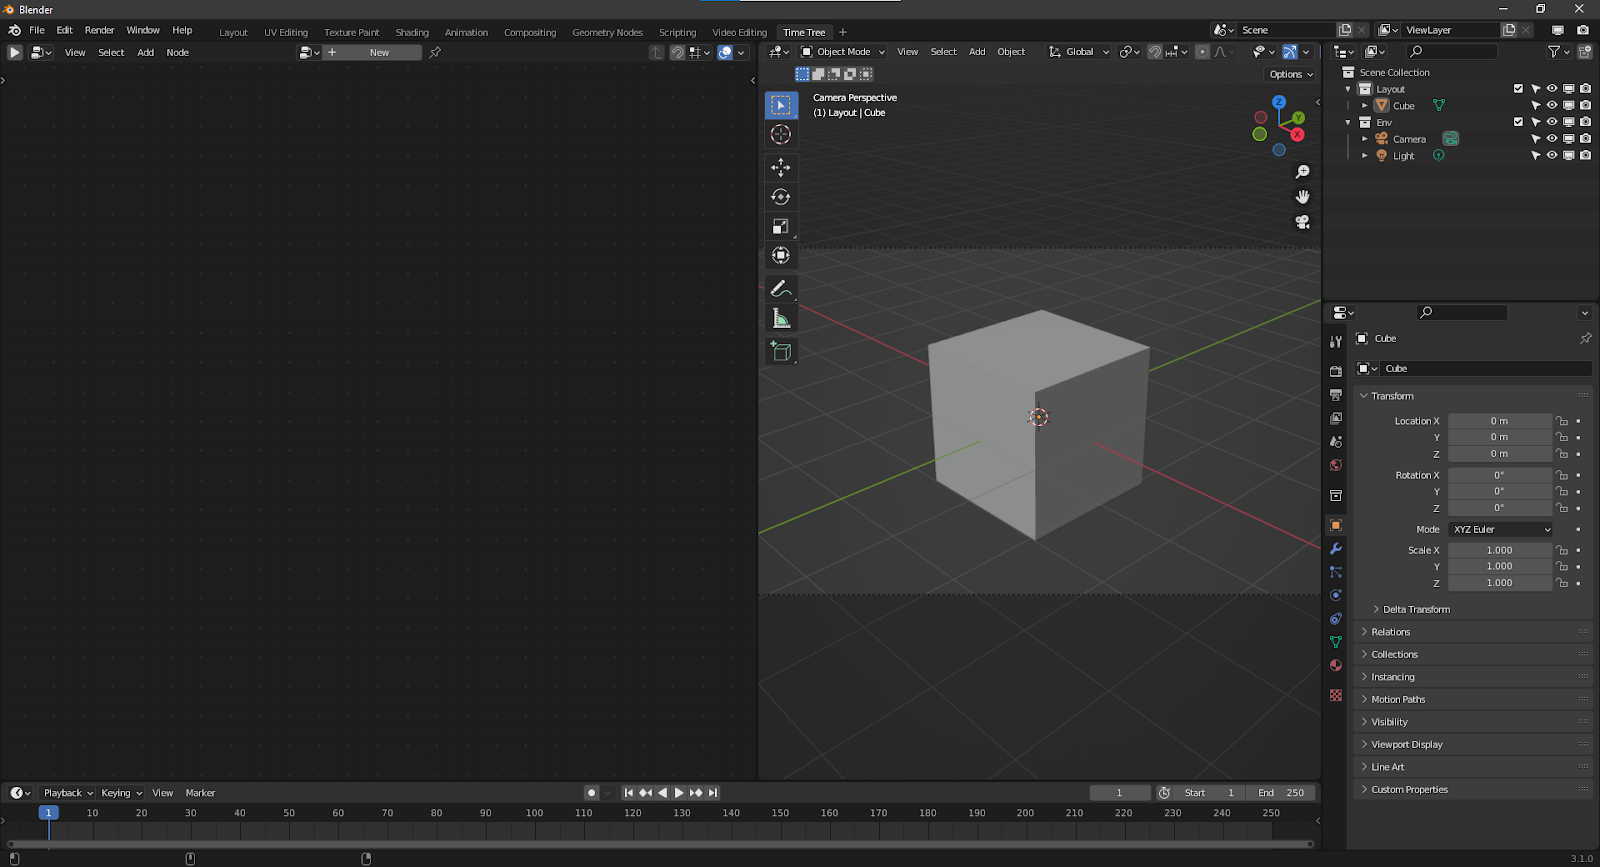
The Time Tree workspace consists of one Time Tree node editor window, one 3D Viewport window and a Timeline window.
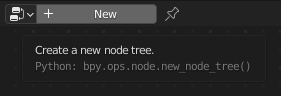
Once you have opened a Time Tree node editor window, create a new Time Tree by clicking on “+ New”
Header & Panel ⤒

The Header & Panel of a Time Tree window share the same interface, the only difference is the absence of the “Create Sequence” button on the Header.
Play / Pause Button
By clicking this button, you’ll be able to play the current Shot sequence starting from the active Shot Node.
Scrubbing Progress Bar
That progress bar is showing you:
- Current time in second.
- Total time in second for selected sequence.
- Current time progression in [0, 1] range.
You can scrub this progress bar to change the playback of the current Shot sequence.
Create Sequence Button
When enabled, this button will create the VSE strip sequence for you by reading the whole Shot sequence which includes the current active Shot node.
If a workspace named “Video Editing” is present, it will also directly switch to that workspace.
To keep things well organized, the video sequence will come with its own new scene, named “ShotSequence” (then “ShotSequence.001” etc).
From each Shot node will come a new scene named after its own shot, allowing it to play with unique composition.
That composition is created from the source scene, so make sure that you created one before pushing that button if you need a particular compositing on each Shot.
Nodes ⤒
There are two ways of creating new nodes:
- Via the header menu “Add”.
- Via the contextual menu “Add” (default shortcut Shift+A).
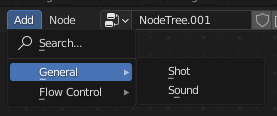
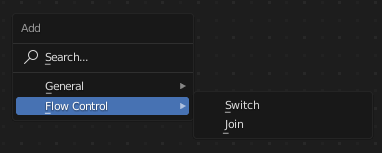
From these menus, you’ll be able to add:
- Shot Nodes
- Sound Nodes
- Switch Nodes
- Join Nodes
Shot Node ⤒
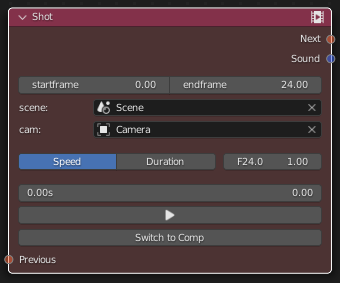
Previous / Next Socket
Sockets used to link previous and next Shot, Switch or Join nodes.
Sound Socket
Socket used to link Sound nodes, as many as you need.
Frame Range
Frame numbers relative to the current selected scene.
Putting Start Frame Number superior to End Frame Number will result in a reverse playback.
Sources
Actual scene and camera used in the Shot.
Speed & Duration
If Speed is selected, the number input field is a time multiplier.
When Duration is selected, the Shot duration will match the number of frames entered in the number input field.
Time / Progress Bar
That progress bar is showing you:
- Current time in second.
- Current time progression in [0, 1] range.
You can scrub this progress bar to change the playback of the Shot.
Play Button
Play the Shot in a loop.
Switch to Comp Button
When “Compositing” workspace is present, it will switch to that workspace and the relevant scene containing the current Shot.
Sound Node ⤒
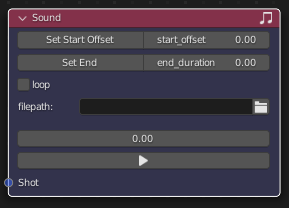
Shot Socket
Socket used to link to the parent Shot node.
Set Start Offset Button & start_offset
start_offset is relative to the start of the current Shot, in second.
When clicking Set Start Offset, start_offset will be computed to synchronize the actual progress time set by the progress bar of the parent Shot and the progress bar of the sound with this formula:
start_offset = shot_current_time - sound_current_time
Set End & end_duration
end_duration is relative to the start of the current Shot, in second.
Clicking on Set End will compute a new end_duration value to match the current global progress time with this formula:
end_duration = current_time - sound_start
Loop
The sound file loop until reaching the end_duration time.
Filepath
File path to the sound file to play.
⚠️Make sure to use global path (uncheck “relative path” when selecting the file).
📣 Limitation removed in v1.0.1
Time / Progress Bar
That progress bar is showing you:
- Current time in second.
- Current time progression in [0, 1] range.
You can scrub this progress bar to change the playback of the Sound.
Play Button
Play the Sound in a loop.
Switch & Join Nodes ⤒
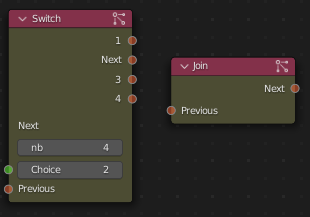
Switch
This node is used to choose which will be the next Shot, Switch or Join node.
Changing the nb field will allow you to change the amount of out sockets.
The Choice field indicates which out socket will be in use, that socket will then change its name to “Next”.
Join
You can link as many of Shot, Switch or Join nodes to the Previous socket.
Then, like a regular Shot node, only one link to a Shot, Switch or Join node is permitted.